Hip Dislocation - posterior prosthesis

Introduction
These techniques are described for the most common type of hip dislocation, which is the posterior dislocation of the artificial hip. The natural hip is a true ball and socket joint, unlike the shoulder which is more like a golf ball resting on a tee. This gives the hip far more stability but less range of movement, with large forces (high velocity trauma) required to dislocate the joint, meaning that associated injuries almost always occur - simple closed reduction in the emergency department may not be possible.

Clinical presentation and anatomy
Patients who have had hip replacements are often told not to lift their knee above the level of their hip, or cross their legs, and with good reason - this is a position of weakness. A combination of hip flexion, adduction and internal rotation places the ball at the posterior rim of the socket, and can allow the ball to roll over the rim.
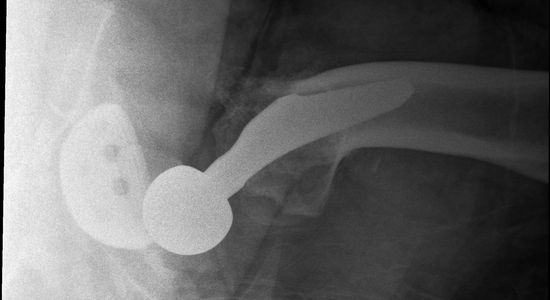
Subsequent spasm of the muscles longitudinally traversing the hip joint leaves the ball sitting behind the rim. The muscle spasm causes superior movement and further wedging of the ball. This can be seen in the X-ray above, and clinically as leg shortening and internal rotation.

Techniques
The following techniques use either the position of weakness (flexion/adduction/internal rotation) or a zero position-style technique to reduce the effect of the spasming muscles to cause reduction. Due to the true ball and socket nature of this artificial joint and the inherent stability (in normal position) and tightness (in dislocation) of the surrounding muscles, an element of traction is usually required. This should not be applied until the desired position is achieved for the flexion position, and only applied in a steady continuous manner throughout movement for the extension technique.
Flexion technique
Secure the pelvis
This technique can be done with the operator stood next to the bed (my preference) or squatting on the bed over the patient. This will depend on your size and length of levers (forearms etc) and the size/weight of the patient's leg. A second operator can be used to help secure the pelvis in place, they are more likely to slide with any traction if they are light weight or on a moving surface (such as a slide sheet). This operator is not trying to fight against your traction, which should only be applied once in the correct position - at least 90 degrees flexion, adduction, and internal rotation, and with a 'feel 'of the head at the rim of the socket.
Click here for a clinical video demonstrating this technique (with thanks to Nick FareBrother, Dr Rachel O'Dwyer and Dr Domagoj Vodanovich)
Don't use excess traction
If excessive traction is used (or the ‘pull’ operator loses track of the 3-dimensional space due to exertion or positional difficulty) and the following problems can occur which will stop you getting into the correct position and subsequently require huge forces to achieve reduction:
- Pelvis tips upward, this causes a reduction in hip flexion angle, leaving the ball wedged more posteriorly behind the rim.
- Downward traction. A similar effect can occur with traction directed through the femur in a downwards pull direction, rather than with femur in a 90 degrees angle.
- Abduction of hip either from pelvis being tilted medially (affected side) or the knee being pulled outwards during traction, or a combination of both. This leaves the ball wedged more medially behind the rim.
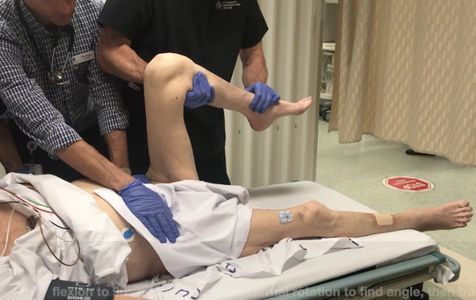
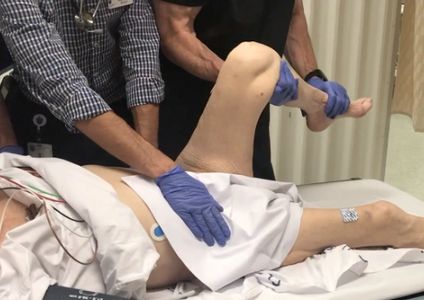
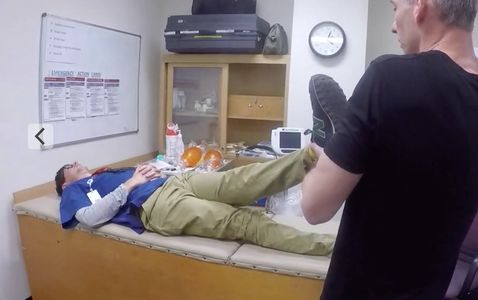
Flexion Technique Step-by Step - Standing Technique
1 - Flexion to at least 90 degrees
2 - Adduct to approximately 30 degrees
3 - Find the spot. Internal/external rotation to find angle where ball sits on rim of socket (you may feel a clunking movement)
4 - Traction. Fix the pelvis, then (and only then) apply upwards traction ensuring you maintain flex/adduct positioning as you pull up through the axis of the femur
5 - Rotation while maintaining traction. Add internal/external rotation movements - the knee shouldn't move side to side or anterior/posterior, just rotate. The femoral axis shouldn't change, the rotation at the knee transmitted through to femoral head.
Click below for a brief tutorial on the flexion technique (with thanks to Dr Nick Bailey).

Should I stand or get on the bed?
Sometimes, no matter how tall you are, your limbs aren’t quite long enough to safely do the job.
Most of the time I am able to stand next to the bed and manipulate the knee and lower leg to find the perfect position before I generate some traction, using my elbow against my torso as a strong platform to lift, while keeping a big picture view of the hip/femur/knee in 3 dimensional space. If the limb I’m moving is huge, or I can’t quite get the position I’m after then I’ll get up on the bed. The same principles apply, with a focus on positioning before any traction/rotation is applied. In a squat position, the elbows into the quadriceps and patient’s foot into the abdomen provide a stable platform for a controlled set of movements.
Operator Start technique - On-the-bed Technique
1 - Comfortable squat that does not extend the hip when you 'sit back' into it
2 - Elbows wedged into thighs for a leverage from a stable platform
3 - Hands under patient's knee
4 - Patient's foot firmly in your abdomen
Click below for a step-by-step demonstration of the on-the-bed flexion technique including the starting position.
Flexion Technique Step-by Step - On the bed Technique
1 - Flexion to at least 90 degrees
2 - Adduct to approximately 30 degrees
3 - Find the spot. Internal/external rotation to find angle where ball sits on rim of socket (you may feel a clunking movement)
4 - Traction. Fix the pelvis, then (and only then) apply upwards traction ensuring you maintain flex/adduct positioning as you pull up through the axis of the femur
5 - Rotation while maintaining traction. Add internal/external rotation movements - the knee shouldn't move side to side or anterior/posterior, just rotate. The femoral axis shouldn't change, the rotation at the knee transmitted through to femoral head.
Click below for a step-by-step demonstration of the on-the-bed flexion technique.
Extension Technique - Hip 'Zero position'
Hip 'Zero Position'
This is the technique I have used when putting hips back in without sedation/analgesia and so requires a cooperative patient. Can also be used once you have sedated/relaxed a patient, and can be a good option if the lower limb is very heavy.This technique is aiming for a hip ‘zero position’ where the majority of the muscles traversing the hip are aligned in a longitudinal fashion over the hip. This removes the translational forces of the muscles and with a combination of voluntary relaxation of the muscles and longitudinal traction at the right angle, can result in a gentle reduction. Final position is approximately 30 degrees adduction, 30 degrees flexion. A small amount of internal rotation and momentum generated by small internal/external rotation movements assist with the final point of reduction. Theoretically, this would work with traction applied to a slightly bent knee - a bit awkward to apply (patient diagonal and leg hanging off bed) but would shorten the hamstrings therefore loosening them further.
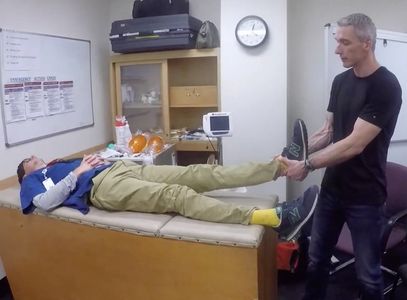
Extension Technique Step-by-step
1 - Fix pelvis
2 - Traction – hold ankle with leg in full extension. Lean back to provide gentle steady traction
3 - Lift affected leg over other leg. Aim for hip ‘zero position’ – 30 degrees adduction, 30 degrees flexion
4 - Internally rotate
5 - Small internal/external rotation movements

Click below for a brief video tutorial on the extension technique (with thanks to Dr Nick Bailey)
Hip, hip, hooray!

“I’ve got to get to the match….”
I live in Melbourne and for the locals, AFL is a massive part of the culture. So, when I went to see a frustrated elderly gentleman who had been brought into resus he was less annoyed by his recurrent hip dislocation than the fact that he was going to miss watching the match with his mate. He had been on a tram when he decided to tie his shoelace, the tram jerked and next minute his hip was out and he was on the floor. Having spent a few days in hospital recently following a dislocation he was very unimpressed at the idea of staying in again. After a quick X-Ray to confirm the diagnosis I suggested trying a drug free technique which would at least reduce the amount of time he would need to stay in hospital. He readily agreed and a quick extension technique later the hip slipped in painlessly. My man didn’t even wait for a repeat X-ray, jumping out of bed and walking out with a “thanks doc, I’ll get to my mate’s house for the match!”

This one's for you, Dad!
I’m often asked who my role models are, and the answer is easy – my Dad, Neil Cunningham senior. These techniques are dedicated to him. Having finally talked Dad into having his hip replaced a couple of years ago, he’s had a new lease of life and runs around coaching football for his grandchildren (he still has a wicked right foot shot!) In fact, the op was so successful he now thinks it was his idea. He’s not a huge fan of hospitals so if at some point in the future you have a grumpy patient called Neil Cunningham who has popped his hip out while attempting an overhead kick, go easy on him, and please make my mum a cup of coffee.